Half Drop Repeats in Photoshop
Here's a little addendum to yesterday's post about creating repeating patterns in Photoshop. This variation of of the repeating pattern technique, makes creating simple half-drop repeat in Photoshop is really easy.
First create a new document the size of your final pattern. Make sure it's an even number of pixels high and wide. Make a note of the size because you will need that info later.
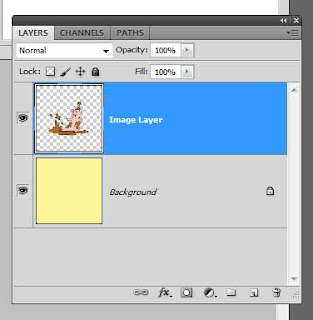
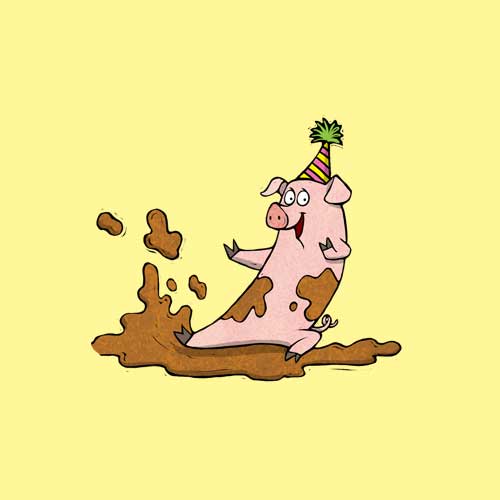
Next set the background to the desired color. For this to work you must make it a solid color (no gradients or anything like that) Remember I said this was a "simple" half-drop repeat. Next create a new layer above the background layer and create or cut-and-paste your pattern here. For my example I cut and pasted this little pig from another file and dropped it in here.

Make sure your image does not bleed off the edges of document and that it is on it's own transparent layer. Your layer window should look something like this.
Next create a duplicate of your image layer. Photoshop automatically named my new layer "Image Layer copy"
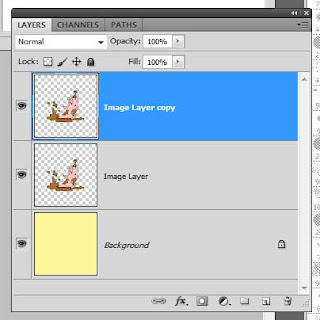
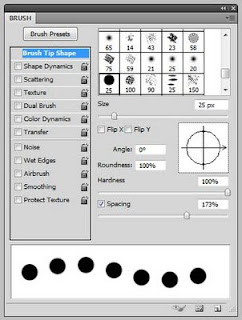
Next, make sure the "image layer copy" layer is selected and click "Filter -> Other -> Offset." Set the horizontal offset to half of the total width of your document. In my case my file is 500px wide so I will set the offset to 250px. Also set the the vertical offset to one half the total height. Again, my document was also 500px high so I set the offset to 250. (This is why we needed an even number of pixels when we initially created our document.) Also check "Wrap Around" for the Undefined Areas. When I click okay my original pig is still there but the new pig has been shifted to the corners.
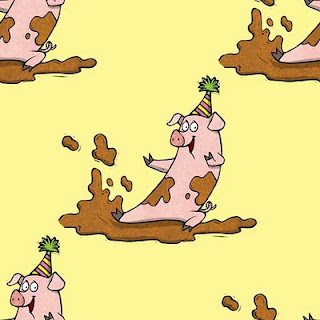
Now, click "Select -> All" and "Edit -> Define Pattern" and you have a simple half drop repeat. Hmmm, I think I need some pajamas made out of my new "pig party" pattern. :)
First create a new document the size of your final pattern. Make sure it's an even number of pixels high and wide. Make a note of the size because you will need that info later.
Next set the background to the desired color. For this to work you must make it a solid color (no gradients or anything like that) Remember I said this was a "simple" half-drop repeat. Next create a new layer above the background layer and create or cut-and-paste your pattern here. For my example I cut and pasted this little pig from another file and dropped it in here.
Make sure your image does not bleed off the edges of document and that it is on it's own transparent layer. Your layer window should look something like this.

Next create a duplicate of your image layer. Photoshop automatically named my new layer "Image Layer copy"

Next, make sure the "image layer copy" layer is selected and click "Filter -> Other -> Offset." Set the horizontal offset to half of the total width of your document. In my case my file is 500px wide so I will set the offset to 250px. Also set the the vertical offset to one half the total height. Again, my document was also 500px high so I set the offset to 250. (This is why we needed an even number of pixels when we initially created our document.) Also check "Wrap Around" for the Undefined Areas. When I click okay my original pig is still there but the new pig has been shifted to the corners.
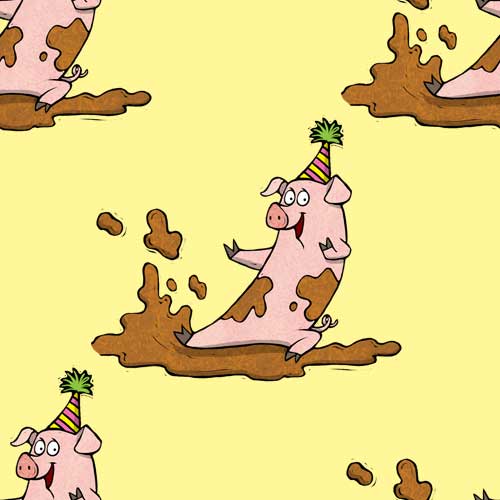
Now, click "Select -> All" and "Edit -> Define Pattern" and you have a simple half drop repeat. Hmmm, I think I need some pajamas made out of my new "pig party" pattern. :)


Comments