Creating Perspective Lines in Illustrator
Here is one more tip from my SCBWI talk this past weekend. I have found this to be a handy technique hopefully someone else will too.
I have always had a problem when laying out perspective lines. I draw my horizon line on the paper, no problem. But when I go to establish my vanishing points they always seem to be somewhere off the edge of the paper. Does this happen to anyone else or is it just me?? Sometimes I can just tape on some extra paper but sometimes they are clear off the edge of the drawing board.
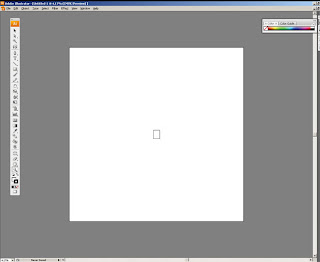
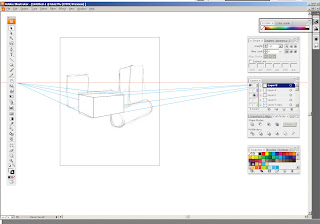
I've found Adobe Illustrator a handy solution. Adobe Illustrator gives the user a work area called the "Pasteboard". In the center of that is the "Artboard" The Artboard represents your paper (i.e. the stuff that's gonna print) The Artboard is a whopping 120" x 120". Much bigger than my drawing table. This give me lots of room to establish my vanishing points.
As you can see from the following screen shot. I zoomed way out. The white area is my pasteboard and the little rectangle in the middle represents a 8 1/2" x 11" piece of paper.
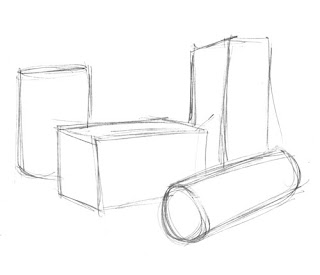
Typically what I do is scan in my rough pencil drawing and save it as a .jpg file. Then in Illustrator I go to File-> Place and select my sketch and check off the Template option.
Here's my sketch which definitely needs some help...
Once the sketch is placed in Illustrator there I use the pen tool to create the horizon line. If you hold down the shift key it will force the line to be perfectly horizontal just like your horizon line should be. I usually make it red so I don't confuse it with other lines later. Also it's handy to put the horizon line on it's own locked layer so you don't erase it by mistake.
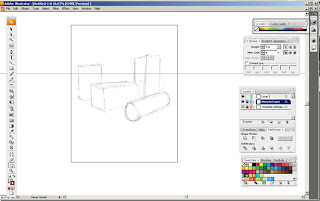
Once the horizon is established I pick another line color (usually blue) for my guidelines. Make sure you have smart guides on (CTRL-U) and using the pen tool create a line that starts on the horizon line and goes down to your object. To make vertical lines use the pen tool but hold down the shift key again (the shift key will make your lines absolutely horizontal or absolutely vertical) So then you end up with something like this...
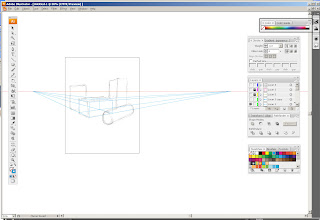
The next step is to create the cube. I create another layer and lock the guideline layer so I'm not moving them by mistake. Then making sure you still have smart guides (CTRL-U) on, use the pen tool connect the guidelines to create a box...
This technique also works for cylinders. Just block it in like the above and then create an oval using the circle tool. But rotating and resizing the oval with the free-transform tool you can make it fit withing your guidelines. That is usually good enough for what I'm doing but it's not 100% correct. If you really need a more precise circles in perspective check out this tutorial from KH Illustration.
After creating guidelines for each of the objects and connecting the dots here's the final result (I've hidden the guideline and horizon layers).
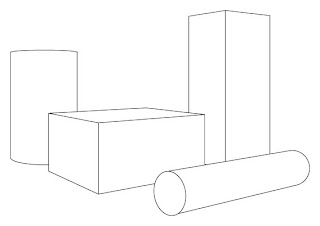
Now what I typically do is print this out. Then using pencils and tracing paper I trace over it to add more details.
I have always had a problem when laying out perspective lines. I draw my horizon line on the paper, no problem. But when I go to establish my vanishing points they always seem to be somewhere off the edge of the paper. Does this happen to anyone else or is it just me?? Sometimes I can just tape on some extra paper but sometimes they are clear off the edge of the drawing board.
I've found Adobe Illustrator a handy solution. Adobe Illustrator gives the user a work area called the "Pasteboard". In the center of that is the "Artboard" The Artboard represents your paper (i.e. the stuff that's gonna print) The Artboard is a whopping 120" x 120". Much bigger than my drawing table. This give me lots of room to establish my vanishing points.
As you can see from the following screen shot. I zoomed way out. The white area is my pasteboard and the little rectangle in the middle represents a 8 1/2" x 11" piece of paper.

Typically what I do is scan in my rough pencil drawing and save it as a .jpg file. Then in Illustrator I go to File-> Place and select my sketch and check off the Template option.
Here's my sketch which definitely needs some help...

Once the sketch is placed in Illustrator there I use the pen tool to create the horizon line. If you hold down the shift key it will force the line to be perfectly horizontal just like your horizon line should be. I usually make it red so I don't confuse it with other lines later. Also it's handy to put the horizon line on it's own locked layer so you don't erase it by mistake.

Once the horizon is established I pick another line color (usually blue) for my guidelines. Make sure you have smart guides on (CTRL-U) and using the pen tool create a line that starts on the horizon line and goes down to your object. To make vertical lines use the pen tool but hold down the shift key again (the shift key will make your lines absolutely horizontal or absolutely vertical) So then you end up with something like this...

The next step is to create the cube. I create another layer and lock the guideline layer so I'm not moving them by mistake. Then making sure you still have smart guides (CTRL-U) on, use the pen tool connect the guidelines to create a box...

This technique also works for cylinders. Just block it in like the above and then create an oval using the circle tool. But rotating and resizing the oval with the free-transform tool you can make it fit withing your guidelines. That is usually good enough for what I'm doing but it's not 100% correct. If you really need a more precise circles in perspective check out this tutorial from KH Illustration.
After creating guidelines for each of the objects and connecting the dots here's the final result (I've hidden the guideline and horizon layers).

Now what I typically do is print this out. Then using pencils and tracing paper I trace over it to add more details.


Comments