Repeating Patterns in Photoshop (Part 3 - Incorporating Patterns into Illustrations)
This is the final part of my pattern tutorial. In this tutorial I'm going to show you how I incorporate patterns in my illustrations.
In Part 1 I talked about how to create seamlessly repeating pattern in Photoshop. In Part 2, I shared my techniques for coloring and layering those patterns and in this last part I'm going to show a few more tricks.
Up until this point we have have made patterns that are flat. And sometimes that's all we need. Maybe we just need an interesting background for a spot illustration.

But what if we want to add a pattern to an object in an illustration like a wall?
For instance, let's add some fish wallpaper to this scene.


If I create a new layer and fill it with the pattern I created I get something like this.


Ok the pattern size is better, but the fish are still floating in midair. We need the fish to follow the perspective of the wall. For that, we can use the transform tool.
Make the fish pattern layer the current layer. Click Select -- All then Edit -- Free Transform.
Now hold down the Command key on a Mac or the Ctrl key on Windows and drag one of the corners of the pattern. You can make squish and stretch the pattern until it fits on the wall like so:

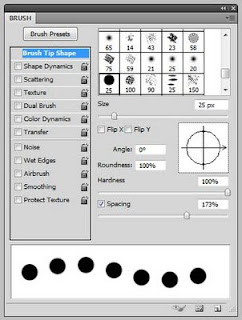
OK almost there. Now create a layer mask. With the layer mask selected use the brush tool to color the sections of the the pattern we don't want to see in black. We can also add some texture to the pattern by added some textured brush strokes to the layer mask.

I further softened the pattern by setting the layer blend mode to Overlay. And this gives us a final product like this:

Adding patterns to clothing is tougher. There are lots of different angles and wrinkles and creases. Typically dropping in a pattern can look very mechanical and can make an otherwise painterly illustration look very digitally. In some cases you can get by using the Free Transform or the Warp tool. But I feel that drawing the pattern by hand is probably the best way to handle patterns on textiles.
I hope this helped you get started added patterns to your illustrations.
In Part 1 I talked about how to create seamlessly repeating pattern in Photoshop. In Part 2, I shared my techniques for coloring and layering those patterns and in this last part I'm going to show a few more tricks.
Up until this point we have have made patterns that are flat. And sometimes that's all we need. Maybe we just need an interesting background for a spot illustration.

But what if we want to add a pattern to an object in an illustration like a wall?
For instance, let's add some fish wallpaper to this scene.

Here is the pattern document that I used to define the new pattern (see Part 1 of this tutorial for details how to do this)


Not quite what we needed. First of all the fish are way to big. We can scale them down by going Edit -- > Fill and checking the Script check box and selecting Brick Fill.

That will bring us to the Brick Fill window where we can enter a new Pattern Scale setting. Let's make it much smaller - 25% of the original size. Make sure the Offset is set to 0.


Ok the pattern size is better, but the fish are still floating in midair. We need the fish to follow the perspective of the wall. For that, we can use the transform tool.
Make the fish pattern layer the current layer. Click Select -- All then Edit -- Free Transform.
Now hold down the Command key on a Mac or the Ctrl key on Windows and drag one of the corners of the pattern. You can make squish and stretch the pattern until it fits on the wall like so:

OK almost there. Now create a layer mask. With the layer mask selected use the brush tool to color the sections of the the pattern we don't want to see in black. We can also add some texture to the pattern by added some textured brush strokes to the layer mask.

I further softened the pattern by setting the layer blend mode to Overlay. And this gives us a final product like this:

I hope this helped you get started added patterns to your illustrations.

Comments
Thank you for your consideration.