Photoshop Brushes - Flow Vs Opacity
I'm giving a presentation next month with my friend Carlyn Beccia at the New England SCBWI conference. I get to speak about Photoshop painting techniques. And I thought this would be a perfect time for me to really look at some of the features of the Photoshop brush tool.
When you click on the brush tool you have an option to set the flow and opacity of your brush. This is one of those things that I found very confusing in Photoshop. What the heck is the difference between Flow and Opacity? They both have to do with the transparency of the brush strokes, but depending on the brush you are using they can seem to do pretty much the same thing. But there are some difference between the two.
According to the Photoshop help file, flow sets the rate at which color is applied as you move the pointer over an area, where as opacity sets the transparency of color you apply. Umm, I don't know about you, but that really didn't help me a whole lot.
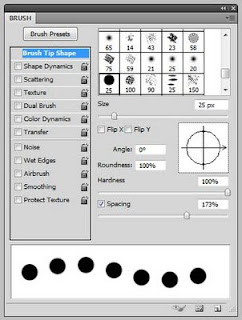
So let's take a closer look at each options. Let's select the hard round default brush. If we draw with this brush it looks like a think solid line but when we open the brush palette and increase the spacing we notice that this brush is lots of circles being laid down really close to one another, if you lay them down close enough together they look like one continuous line.
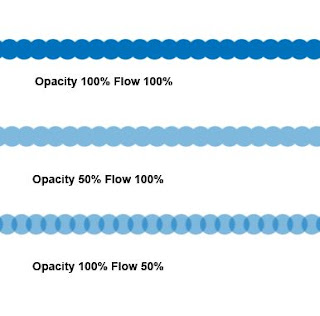
So for now let's leave the spacing kind of wide so the individual circles are touching slightly, somewhere around 70%. Now if I set the opacity to 100% and the flow to 100% and draw a line with this brush I get a sort of rippled solid blue line. No surprise there. If I leave the flow at 100% but reduce the opacity to 50%, I get the exact same ripply line only 50% lighter. But if I reverse it and leave the opacity at 100% and reduce the flow to 50% I get something a little different. Now, each little dab of the brush is reduced to 50% but where those little dabs overlap the paint coverage is actually darker than 50%.
Okay so that's not too confusing. Now what happens if I start reducing both the opacity AND the flow? This is where is can start hurting your head.
I like to think of opacity as being the main transparency governor. If I set the opacity to 75% then no part of my stroke will ever be stronger than 75% transparency. Within that 75% range I can decide how transparent each dab of the brush will be from 1 to 100%. So let's say my opacity is set at 75%, even if I set my flow to 100% my stroke will still only be 75% of the original color.
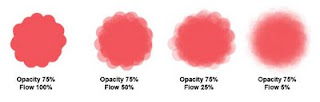
Right now you might be saying, well, that's great, but how is that going to help me with my painting? Look at these four samples. In each one, I scribbled around and around in circle until I could go no darker. As you can see the center of each dot is the same color (75% opacity) but you can see when I used a lower flow rate, I needed more little dabs of paint to get to that color. At 5% flow I was scribbling quite a lot longer than I was at 100% flow. So flow gives you a way to gradually build up to your darkest color where opacity lets you define what that darkest color will be. You can use this to your advantage to make your brush strokes more or less pronounced.
When you click on the brush tool you have an option to set the flow and opacity of your brush. This is one of those things that I found very confusing in Photoshop. What the heck is the difference between Flow and Opacity? They both have to do with the transparency of the brush strokes, but depending on the brush you are using they can seem to do pretty much the same thing. But there are some difference between the two.
According to the Photoshop help file, flow sets the rate at which color is applied as you move the pointer over an area, where as opacity sets the transparency of color you apply. Umm, I don't know about you, but that really didn't help me a whole lot.
So let's take a closer look at each options. Let's select the hard round default brush. If we draw with this brush it looks like a think solid line but when we open the brush palette and increase the spacing we notice that this brush is lots of circles being laid down really close to one another, if you lay them down close enough together they look like one continuous line.

So for now let's leave the spacing kind of wide so the individual circles are touching slightly, somewhere around 70%. Now if I set the opacity to 100% and the flow to 100% and draw a line with this brush I get a sort of rippled solid blue line. No surprise there. If I leave the flow at 100% but reduce the opacity to 50%, I get the exact same ripply line only 50% lighter. But if I reverse it and leave the opacity at 100% and reduce the flow to 50% I get something a little different. Now, each little dab of the brush is reduced to 50% but where those little dabs overlap the paint coverage is actually darker than 50%.

Okay so that's not too confusing. Now what happens if I start reducing both the opacity AND the flow? This is where is can start hurting your head.
I like to think of opacity as being the main transparency governor. If I set the opacity to 75% then no part of my stroke will ever be stronger than 75% transparency. Within that 75% range I can decide how transparent each dab of the brush will be from 1 to 100%. So let's say my opacity is set at 75%, even if I set my flow to 100% my stroke will still only be 75% of the original color.
Right now you might be saying, well, that's great, but how is that going to help me with my painting? Look at these four samples. In each one, I scribbled around and around in circle until I could go no darker. As you can see the center of each dot is the same color (75% opacity) but you can see when I used a lower flow rate, I needed more little dabs of paint to get to that color. At 5% flow I was scribbling quite a lot longer than I was at 100% flow. So flow gives you a way to gradually build up to your darkest color where opacity lets you define what that darkest color will be. You can use this to your advantage to make your brush strokes more or less pronounced.


Comments
thank
you