Photoshop and Wacom Tablets

When I first started using the computer to create illustrations I primarily used Adobe Illustrator. This paper plate design was the first image in which I used Photoshop. I also used a mouse to create all my work (yep, I did that jungle plate with a mouse.) Wacom tablets were/are expensive, and I thought $400 was a ridiculous amount to pay for one. Oh, did I mention that I'm a cheap skate?
But then a friend of the family, who happened to be a graphic designer came to the house and saw my workspace. And she said, "you idiot, go buy a pen tablet!" I'm sure she said it much more diplomatically than that, but that was the gist. And she was right. If you want to use Photoshop for painting, a mouse will only take you so far. You really need to invest in a tablet. The good news is they have come down considerably in price.
The really difficult part of using a tablet is that you draw in your lap but your brush strokes show up on the monitor. That incongruity takes some getting used to. And honestly, I never found it as natural as drawing with paper and pencil, although I know some artists that don't have a problem. But a couple of years ago I upgraded to a Cintiq. The Cintiq is basically the Cadillac of the Wacom line. It's a monitor with a Wacom tablet built into it, so instead of drawing on a separate tablet you draw directly on the monitor. Sound cool? It is wicked cool, and much more natural feeling to me. I can't tell you how much I love my Cintiq. One of the function buttons was sticking the other day on my precious baby and I was fretting as if one my real children had come down with the flu. What would I do if my poor Cintiq became ill?! Luckily it recovered on it's own. Phew!
Programming the Wacom Function Keys
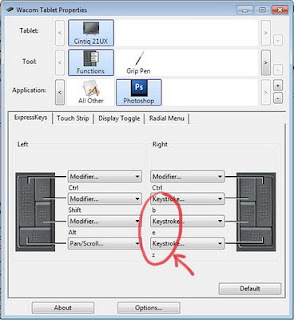
When I first started using a Wacom tablet I didn't make good use of the available funtion keys. I still had one hand on the keyboard to do things like hit "b" (the hotkey for the brush tool) and "e" for the eraser tool and my all-time favorite "CTRL-ALT-Z" for undo. But I have since started programming my Wacom for the way I work and it has definitely streamlined up my work flow.
Think about the tools that you use most in Photohsop and try bringing that functionality down to the tablet. I spend most of my time switching between the brush tool and the eraser tool. So in the Wacom preference utility, I set the left function keys to "b", "e" and "CTRL-ALT-z". The preference utility can be accessed in Windows by going to "Programs -> Wacom Tablet -> Wacom Tablet Properties" Notice how I can specify that the keys only have this behavior within Photoshop. You can set up different behavior for use in other applications (Illustrator for example)

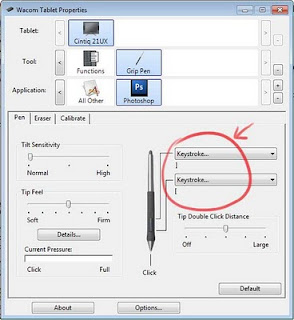
The other thing that I have found very useful is to reprogram the buttons on the actual Wacom pen. I have set the top one to the left bracket and the bottom one to a right bracket. "[" and "]" are hot keys that are used in conjunction with brush tools. The they will resize the paint brush up and down in incremental steps. That way I can increase and decrease the size of my brush just by tapping my finger against my pen.

I recommend playing around with various button configurations and see what works for you.
Note: I think the newest Intuos 4 tablets have a different function key configuration so my preference screens may look different than yours.

Comments